Saat ini
orang cenderung memiliki
laptop daripada komputer
desktop karena mereka lebih nyaman digunakan. Portabilitas
adalah fitur yang paling menarik
dari laptop dan ini
adalah salah satu keuntungan yang berbeda
yang menikmati lebih dari
desktop kikuk.
Dan meskipun laptop cukup terjangkau hari ini,
ada beberapa high-end yang
yang harganya bom. Berikut ini adalah daftar 10
laptop paling mahal. Beberapa biaya hampir beberapa ribuan dolar tetapi beberapa yang bernilai lebih dari satu
juta.
Coba lihat. . .
1. Luvaglio
Harga: Rp 1.000.000 ($ 1 juta)
Laptop ini dibangun untuk memesan saja, dan pembeli diberikan pilihan untuk memilih
spesifikasi dan desain
laptop dan juga yang material yang akan digunakan untuk membuat tubuh.
Perangkat keras dan perangkat
lunak adalah diupgrade.
Ini fitur drive 128 GB hard, Mp3
player, tertanam USB stick dan sistem tampilan pembersihan
otomatis, antara lain.
2. Tulip E-Go Berlian
Harga: $ 355.000
Tulip E-Go Berlian
bangga emas,
berlian, casing krom,
dan desain modis.
Ini adalah fitur dengan 12 "layar antiglare, 2GB RAM, 160 GB Hard Drive, kamera integrated,
Bluetooth, dan DVD Burner.
3. Ego untuk Bentley
Harga: $ 20,000
Untuk seorang wanita yang mencintai untuk tetap
berhubungan dengan teman-temannya facebook di mana saja dia pergi dan tetap stylish dan modis,
laptop ini untuknya.
Bentley logo bertabur pada casing dan itu adalah fitur dengan 16 bit sistem operasi Vista dan 160 HDD Gigabyte.
Ini adalah produk Bentley resmi.
4. Voodoo Envy H: 171
Harga:
$ 8.500
Voodoo
Envy H: 171
adalah laptop edisi ekstrim di mana ia dioptimalkan untuk tantangan
besar dan kuat. Hal ini
didukung oleh Intel Core
2 Extreme X6800 prosesor,
dual Nvidia Quadro
FX Go 2500m chipset grafis,
ruang ganda 250GB
hard disk, kamera 1,3 mega pixel, 7 in 1 card reader memori, lapisan ganda DVD RW
dan 17 inci resolusi
tinggi 1920 1200
ditampilkan.
Casing
ini tersedia dalam 25
warna dan 14 Tato. Anda dapat
memilih semua warna dan tato yang Anda suka tanpa biaya tambahan.
5. Rock EkstremeSL8
Harga: $ 5,000
Tampilan ini laptop adalah sinar biru kompatibel dengan kemampuan untuk
menampilkan gambar definisi
tinggi atau video.
Hal ini didukung oleh Prosesor
Intel Core 2 Quad, NVIDIA 9800M GPU dengan
konfigurasi SLI dan
luas Byte 8Giga
RAM.
6.
Lenovo ThinkPad W700ds
Harga: $ 4.500
ThinkPad Lenovo W700ds. Laptop
"17 memiliki dual monitor dan cocok untuk orang yang bekerja dengan karya Excel atau akuntansi.
Hal ini dapat
digunakan sebagai layar
sekunder untuk messenger Skype atau online.
Hal ini didukung oleh 2,53
GHz core 2 Quad, Extreme QX9000
ganda 250GB 5200RPM hard disk drive dan
RAM 4GB.
7.
Toshiba Qosmio G35-AV660
Harga: $ 3,500
Toshiba Qosmio G35-AV660 adalah laptop khusus dari Toshiba yang adalah fitur dengan 2.0 GHz Intel Core 2 Duo, 2 GB RAM, nVidia GeForce Go 7600, dan 240 GB HDD RAID
0.
Laptop ini dilengkapi dengan HD DVD Player, 17 inci dengan 1920 1200 resolusi. Ini hanya cocok untuk pecinta film.
Senin, 24 September 2012
Senin, 17 September 2012
10 hewan terlangka di dunia
1. The Pinta Island tortoise
Adanya di kepulauan pinta. Msuk dalam spesies Giant Galapagos Turtoise. Paling langka di dunia soalnya tinggal 1 doang yang masih hidup, which is gak bias berkembang biak lagi. Wong Cuma sendiri mo kimpoi sama sapa ??
Cuma ada 10 dari binatang ini. Adanya di Cina. Aneh yah lumba – lumba nya
Adanya di Vancouver Island, di British Columbia. Tinggal tersisa 75 ekor doang. Tapi udah berhasil dikembang biakan menjadi sekitar 150 ekor dan sekitar 44 yang baru lahir.
Tinggal di Madagascar, Cuma ada kurang dari 100 ekor di dunia. Tapi para ahli masih berusaha buat ngembangin lagi.
BADAK JAWADari 60 yang diketahui, tempat tinggalnya Cuma ada 2 di jawa ( Indonesia) sama di Vietnam. Nih badak masih sering diburu di Malaysia, Sumatra, India buat diambil culanya.
Biasa disebut “Bristly Rabbit” bias ditemukan di Himalaya, Nepal, Bengal, and Assam. Cuma bias ditemukan sekitar 110 ekor di dunia.
Gw sendiri gak tau ni binatang apa. Bisa ditemukan di New South Wales and Victoria (Ausi ) tapi sekarang Cuma bias ditemukan di taman nasional dekat Epping Forest Station di Queensland. Cuma ditemukan sekitar 113 ekor doang.
Ditemukan di Philippines. Lucu yah ni kerbau, liat kupingnya deh. Pertama kali dinyatakan terancam punah tahun 2000. kini tinggal tersisa sekitar 30 – 200 ekor. Masih sering diburu sama pemburu liar.
The Lynx. Ini kucing, bukan singa. Sesuai namanya, nih kucing adanya di Iberian ( kalo gak salah di spanyol). Cuma sekarang biasa ditemukan hanya di Andalusia. Kebanyakan mati karena kena perangkap, yang sebenarnya digunakan buat nangkap hewan buruan kayak kelinci. Cuma ada 100, turun dari 400 saat tahun 2000.
Serigala ini masih sodaraan sama gray wolf, tapi ukurannya lebih kecil. Sekarang tempat tinggal mereka ada di timur laut North Carolina. Tinggal 20 ekor red wolves murni ditemukan tahun 1980, tapi sekarang sudah berkembang lebih dari 200 ekor
Adanya di kepulauan pinta. Msuk dalam spesies Giant Galapagos Turtoise. Paling langka di dunia soalnya tinggal 1 doang yang masih hidup, which is gak bias berkembang biak lagi. Wong Cuma sendiri mo kimpoi sama sapa ??
2. Baiji (Yangtze River Dolphin)
Cuma ada 10 dari binatang ini. Adanya di Cina. Aneh yah lumba – lumba nya
3. The Vancouver Island Marmot
Adanya di Vancouver Island, di British Columbia. Tinggal tersisa 75 ekor doang. Tapi udah berhasil dikembang biakan menjadi sekitar 150 ekor dan sekitar 44 yang baru lahir.
4. Seychelles Sheath-tailed Bat
Tinggal di Madagascar, Cuma ada kurang dari 100 ekor di dunia. Tapi para ahli masih berusaha buat ngembangin lagi.
5. Javan Rhino
BADAK JAWADari 60 yang diketahui, tempat tinggalnya Cuma ada 2 di jawa ( Indonesia) sama di Vietnam. Nih badak masih sering diburu di Malaysia, Sumatra, India buat diambil culanya.
6. Hispid hare
Biasa disebut “Bristly Rabbit” bias ditemukan di Himalaya, Nepal, Bengal, and Assam. Cuma bias ditemukan sekitar 110 ekor di dunia.
7. Northern Hairy-nosed Wombat
Gw sendiri gak tau ni binatang apa. Bisa ditemukan di New South Wales and Victoria (Ausi ) tapi sekarang Cuma bias ditemukan di taman nasional dekat Epping Forest Station di Queensland. Cuma ditemukan sekitar 113 ekor doang.
8. Tamaraw (Dwarf Water Buffalo)
Ditemukan di Philippines. Lucu yah ni kerbau, liat kupingnya deh. Pertama kali dinyatakan terancam punah tahun 2000. kini tinggal tersisa sekitar 30 – 200 ekor. Masih sering diburu sama pemburu liar.
9. Iberian Lynx
The Lynx. Ini kucing, bukan singa. Sesuai namanya, nih kucing adanya di Iberian ( kalo gak salah di spanyol). Cuma sekarang biasa ditemukan hanya di Andalusia. Kebanyakan mati karena kena perangkap, yang sebenarnya digunakan buat nangkap hewan buruan kayak kelinci. Cuma ada 100, turun dari 400 saat tahun 2000.
10. Red Wolf
Serigala ini masih sodaraan sama gray wolf, tapi ukurannya lebih kecil. Sekarang tempat tinggal mereka ada di timur laut North Carolina. Tinggal 20 ekor red wolves murni ditemukan tahun 1980, tapi sekarang sudah berkembang lebih dari 200 ekor
Selasa, 11 September 2012
griffty effect tutorial photoshop
In this tutorial we’re going to show you how to add a
dramatic, gritty, bronzed effect to your images. We’ll convert our
subject image as follows:
1. Open our project image and
immediately duplicate the background layer by right clicking the
background layer and selecting ‘Duplicate Layer’. With the ‘Background
Copy’ layer selected, go to ‘Filter’ on the menu and choose ‘Other’
-> ‘High Pass’, enter ‘5′ pixels as the radius and click ok. Next,
change the blend of the ‘Background Copy’ layer to ‘Overlay’.
2. Duplicate the orginal background
layer again (’Background Copy 2′) and move it to the very top of the
layers list. With this new layer highlighted in the layers palette, go
to ‘Image’ on the main menu and choose ‘Adjustment’ -> ‘Desaturate’.
Change the blend of the this new layer to ‘Hard Light’.
3. Click on the right facing arrow in
the top right corner of our layers palette and choose ‘Flatten Image’
from the drop down menu. This once again leaves us with a single layer
‘Background’. Duplicate this layer and press ‘Ctrl+F’ (Commmand-F on
mac) to apply the same filter effect used in step 1. Change the blend
mode of this layer
to ‘Overlay’.
to ‘Overlay’.
4. Flatten the image again (Click on
the right facing arrow in the top right corner of our layers palette and
choose ‘Flatten Image’ from the drop down menu). Next, click the
‘Create New Adjustment Layer’ icon at the bottom of the layers palette
and choose ‘Curves’. In the ‘Curves’ dialog add a point by clicking
directly on the diagnol line (around the upper third in our example),
move it toward the left, and click OK. This will lighten the entire
image (but focus on the eyes).
5. Click on the layer mask thumbnail
of the Curves adjustment layer we just created and press ‘Ctrl+i’
(Command-i on mac), the image will appear darker. Set your foreground
color to white (press D). Select the Brush tool from the toolbox and
using a soft edged brush (I used a brush with diameter of 15px and
hardness of 15%), paint over the eyes to brighten them up.
Our effect looks like this now:
6.Create a new layer, and change your
foreground color to a nice eye color you would like to highlight your
subjects eyes with. We’re going to select a nice light blue (#94C4D4)
for our subject. Change the blend mode of this layer to ‘Color’. Now
using the same brush settings we used in the previous step, paint over
the eyes to highlight them with your selected foreground color. If you
find the color is too vivid, try adjusting the layer opacity to lessen
the effect.
And voila…our dramatic gritty effect is complete! Have fun applying this technique in your projects.
support by :http://alfanartworkcolection.blogspot.com/
Cara mengganti warna mata pada photoshop
1. Basic red eye removal
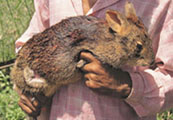
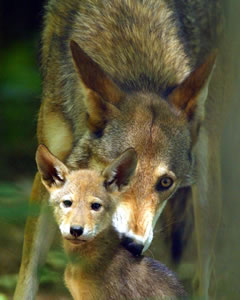
For this tutorial we're going to use the following image:
Save this image to your computer's hard drive by right clicking on it in your browser and selecting Save picture as...
Open this picture in Photoshop.
Duplicate the Background layer by dragging/dropping its thumbnail onto the Create a new layer icon :
Select the Red Eye tool in the tool bar:
With the tool selected use the following settings in the options bar:
Pupil Size: 50%
Darken Amount: 70%:
Make sure that the Background copy layer is the active layer (it will have a dark gray background in the layers palette):
Now remove the red in each eye by making a rough selection like this:
Note: sometimes the Red Eye Tool leaves some red behind. In that case just press Ctrl + Z ( Command + Z on the Mac) and try again:
2. Put red eye correction on a separate layer |
We just did a pretty easy red eye correction, but the result is destructive, meaning that it affected our original image.
In order to turn it into a non-destructive edit we need to separate the actual correction.
First we need to change the layer's blending mode; make sure that the Background copy layer is the active layer (it will have a dark gray background in your layers palette)...
... and set the layer's blending mode to Difference:
Your document window will now show the difference between the two images:
To be able to get a separate layer for what we actually see in our document window (result of two blended layers), we need to merge all visible layer on a separate layer by pressing Ctrl + Alt + Shift + E (command + Option + Shift + E on the Mac):
Memorize this shortcut. It's a lot of keys you need to press, but it's a very useful shortcut that you will use more and more over time.
We can now remove the Background copy layer by dragging/dropping it onto the Delete layer icon :
Continue by renaming Layer 1 to Red Eyes by double clicking on its name:
Our document window will now still show the black background with the two red eyes because we haven't set the proper blending mode yet, so set the blending mode of the Red Eyes layer to Difference:
Your document should now show the image with the corrected red eyes:
As a final step you can consider to right click (Control + click on the Mac) on the eye icon in front of the Red Eyes layer and to select Red as the color to mark this layer:
Color coding layers can be useful during photo retouching, because especially with non-destructive editing you quite often end up with lots of layers layers and without proper names or color coding you can easily lose track.
Continue on the next page if you're interested to know how we can take this all a step further.
Note: The
purpose of step 3 is to show how you can take things a step further, to
increase your understanding about channels and masks and how they can
work together to achieve your goals. However only step 1 and 2 are
needed to understand non-destructive use of the red eye tool.
Notice that our Red Eyes layer is pretty much completely black. When we see something like this we should immediately think about... yes, masks.
So is there a way to use the result of Red Eyes layer as a mask? Yes, by using channels.
Let's look at the channels by clicking on the channels tab:
Notice that it's not only showing the content of our current layer (Red Eyes), but all visible layers instead. So to see only the current layer we have to make the Background layer invisible. First click on the Layers tab and then click on the eye icon in front of the Background layer, which will make this layer invisible. The return to the channels by clicking on the channels tab in your layers palette:
Click on every channel and notice how the red channel would be the proper candidate for a mask, which is obvious since we're attacking the red in the eyes:
I'm now going to show you how you can turn the content of a single channel into a mask.
First select the Red channel:
Select the content of this channel by pressing Ctrl + A (command + E on the Mac) or by choosing in the menu Select / All.
Copy the content of this selection to your clipboard by pressing Ctrl + C (command + C on the Mac) or by choosing in the menu Edit / Copy.
Remove the selection by pressing Ctrl + D (Command + D on the Mac) or by choosing in the menu Select / Deselect.
Click on the thumbnail of the RGB channel(A) to activate all channels (all will now have a in front of them).
Click on the Layers tab (B) to return to the layers palette.
The next step is to make the Background layer visible again by clicking inside the box marked with the arrow (A); the icon will reappear.
Now remove the Red Eyes layer by dragging/dropping it onto the Delete layer icon (B).
Continue by clicking on the Create new fill or adjustment layer icon in your layers palette (C):
Select Hue/Saturation...
Click on the OK button to leave the Hue/Saturation window for now.
Rename this layer to Red Eyes Correction and change the color to red (right clicking its eye icon ):
Alt + click (Option + click on the Mac) on the thumbnail of the mask (A in previous screenshot).
Right now your document window should be completely white and that's because we've opened the mask in our document window. Only this method allows us to paste content to the mask.
Now past the content of our clipboard (the content of the red channel of our old Red Eyes layer) to our mask by using the shortcut Ctrl + V (Command + V on the Mac) or by using the menu: Edit / Paste
Now open the Hue/Saturation adjustment window by double clicking on its icon in the layers palette:
Enter a value of -100 for Saturation and a value of -100 for lightness and click OK:
You'll notice that there's still some red left in the eyes after making this correction:
The reason is because our mask doesn't have enough contrast:
We can fix that by using tools like Levels, Curves, Brightness & Contrast, etc.
Let's use Levels for this one; click once on the thumbnail of the layer mask to make it active (it will now have a double border):
Select in the menu Image / Adjustments / Levels...
Move the white slider to the left (A) until it reads 110 in the box labeled with B or just type the value inside that box:
Click OK when you're done.
The contrast of the mask is now improved...
...and the pupils are now black:
Feel free to make a final Hue & Saturation adjustment with new settings.
Langganan:
Postingan (Atom)